User Management for a Workspace is performed by an Administrator through the Workspace Members and Admin areas of that Workspace's browser interface. This provides the interface to the Identity Service (IDS), with which to define applicable service access, through the specification of Users (Members) and Groups.
 User management is performed by an Administrator through the Members area, and with an Agile solution Workspace, the Admin area of the browser interface..
Controls are spread over the following pages:
-
Workspace Members – use this page to create and manage a list of users; people who are to have access to the Workspace and/or its associated technologies. Users can be those with Altium Accounts within your own organization, or those in a different organization (in the case of the latter, inviting them in as members of a Workspace does not mean they become part of your organization). You can also invite users who do not have an Altium Account (who will need to then register for one).
-
Admin – Groups – if available, use this page to create and manage a list of user groups. Groups allow you to further organize your users according to, for example, the particular section of the organization in which they are involved, or the design team they are in. Groups also make the sharing of Workspace content, and the configuration of other served technologies, more streamlined.
Only an administrative user has full access to management controls. Standard users (non-administrators) can view the list of members from the Workspace Members page of the interface.
Workspace Members
Management of users for access to the Workspace and related services is performed from the Workspace Members page. A user member is simply a person who it is intended will need access to the Workspace.
 Determine which people are to have access to the Workspace, from the Members page of the browser interface.
All defined users are presented in a flat listing.
Within the main listing, each user is displayed in terms of the following information:
-
Name – the user's <First Name> <Last Name> combination, which is acquired from the user's Altium Account profile. You can search for a user by their name (Name field) using the dedicated Search field at the top-left.
An accompanying icon for the user will also be presented, including the first letter of their forename (e.g.  ).
).
-
Email – the user's email address, which they use to sign in to their Altium Account (and also sign in directly to the browser-based Altium 365 Platform Interface (https://365.altium.com)).
-
Groups – the group (or groups) of which the user is currently a member. At the basic software access level this is an Administrator column with a checkbox to reflect whether the user is a Workspace Administrator (checked) or not. 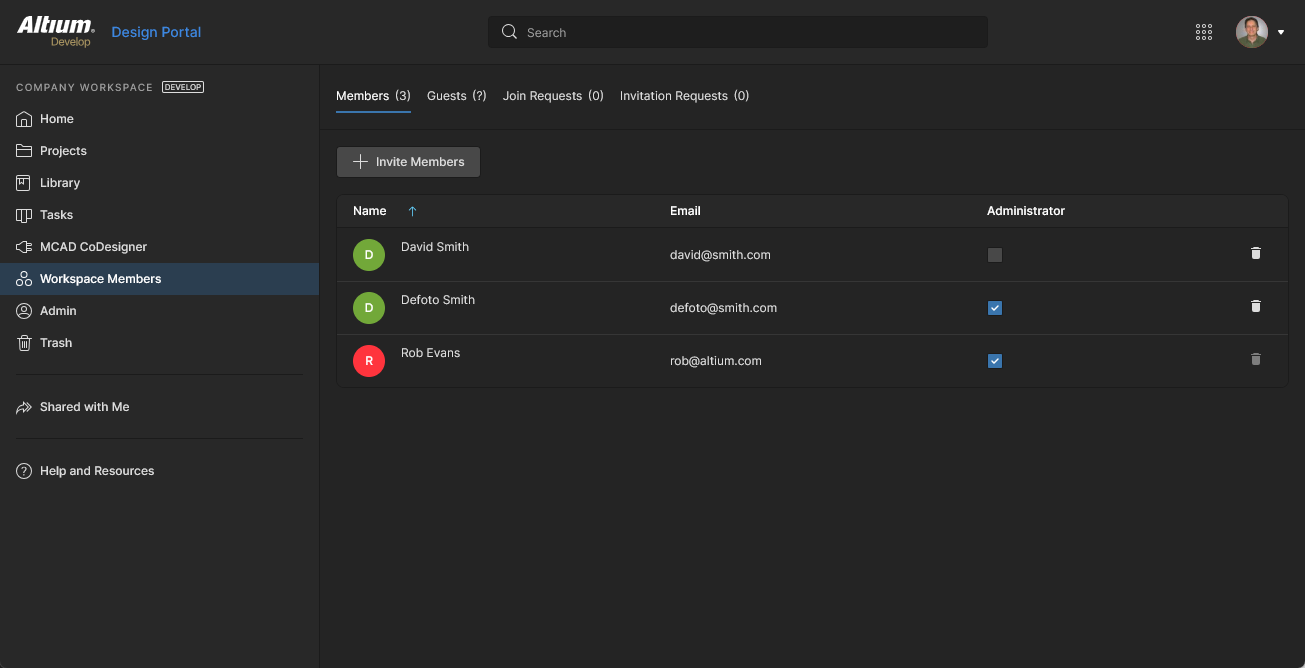
There is no limit to the number of users that may be registered to access and use a Workspace.
Adding a New User
Related page: Inviting Other Users to Your Workspace
A new user can be added for access to your Workspace – inviting them to be a member – in a number of ways. Use the link to the related page above for a more detailed look at the various ways supported. From the Workspace Members page of your Workspace's browser interface, user addition can be performed by clicking on the  button, located at the top-left of the page.
The Invite Workspace Members window will appear with which to enter the email for the prospective user and to specify additional groups membership for that user.
, you will be presented with a window in which to specify one or more users, and their groups membership.") When you click to add a new user (invite people to be a member), you will be presented with a window in which to specify one or more users, and their groups membership.
When you click to add a new user (invite people to be a member), you will be presented with a window in which to specify one or more users, and their groups membership.
You are able to invite:
-
Other Altium Account users from within your own organization.
-
Altium Account users from different organizations.
-
Users without an Altium Account (who will need to then register for an account).
Enter the user's email address into the Add Members field. As you start to type, if the email address belongs to another Altium Account user within your own organization – and who is not already a member of the Workspace – they will be listed for you to choose. If inviting users outside of your organization, irrespective of their Altium Account status, you will need to enter their full email address. Multiple emails can be entered for invitation to the Workspace. To remove a user email click the delete cross, to the right of its name.
It is the user's Altium Account login credentials that enable them to access the Altium 365 Platform Interface, and the Workspace they have been added to. From a browser interface, access to the Workspace will be available as soon as they sign in to Altium 365. From within Altium Designer, the Workspace (and any others that they have been added to as a member) will be presented for use once they have signed in to their Altium Account.
You cannot add another user with the same Altium-registered email address as an existing user.
Groups Assignment
While adding a new user, you also can specify which of the existing Workspace groups the user is to be made a member of. Click within the Add Groups field to pop up a list of all currently defined groups. Select the required group from this list. If the user is required to have administrative rights, select the Administrators group. Multiple groups can be chosen for assignment. To remove a group prior to its final assignment, click the delete cross to the right of its name.
Group assignment may be specified at any stage from the Admin – Groups page but if groups exist, it can be easier to do this at the time of user creation/invite. Bear in mind that if any groups are defined here, they will be applied to all users being invited – those in the Add Members field.
Note that Member Group assignment is available when you have access to the higher-level Altium Solutions. With the basic level of solution access you simply have the option to specify whether or not the user is to be an Administrator. Enable the Administrators option to make them an Administrator, or leave it disabled to invite them as a standard (non-administrative) user.
Click the  control to access an area to enter a note. This will be added to the email invite that the invitee(s) receive.
 Example user set to be invited into the Workspace.
Once all details are filled out and specified as required, click the  button.
-
A user who already has an Altium Account and is in your own organization will be added as Workspace members straight away – appearing in the listing of users back on the main Workspace Members page.
-
A user who has an Altium Account but is not member of your organization can be added as a Workspace member or a access-restricted Workspace Guest.
-
A user without an Altium Account will need to register for one before they are added to the Workspace.
Each user will receive an email with which to gain access to the Workspace. They can access your Workspace by clicking the corresponding button in the email. What happens next depends on whether they already have an Altium Account or not:
-
Invited user has an Altium Account – if the user is currently signed into their Altium Account within their browser, they will be taken to the Workspace (on Altium 365) directly. If they are not currently signed in to their Altium Account, they will be taken to the Altium 365 Sign In page first.
-
Invited user does not have an Altium Account – the user will proceed to an intermediate registration form, with which to define their details, and specify a password. After signing up they will be added to, and taken to, the Workspace.
Editing an Existing User
You can edit an existing user by selecting that user and clicking the  control to the far right, then choose the Edit command from the associated menu. The Edit Workspace Member window will appear, from where you can make changes to that user's group membership(s) as required.
 for the selected user as required.") You can access and make changes to the group membership(s) for the selected user as required.
You can access and make changes to the group membership(s) for the selected user as required.
To remove the user from a particular group in which they are currently a member, click the

control for that existing group.
When all modifications have been made as required, click the  button to effect those changes.
At the lower level of Altium design solution access you only can specify if the member is included in the Administrators group, using the associated checkbox in the Administrators column. A Window will appear asking you to confirm your decision to add/remove the user from the group (this can be set to not appear thereafter) – click  .
.
 With basic software access you can add or remove a user from the Administrators group as required.
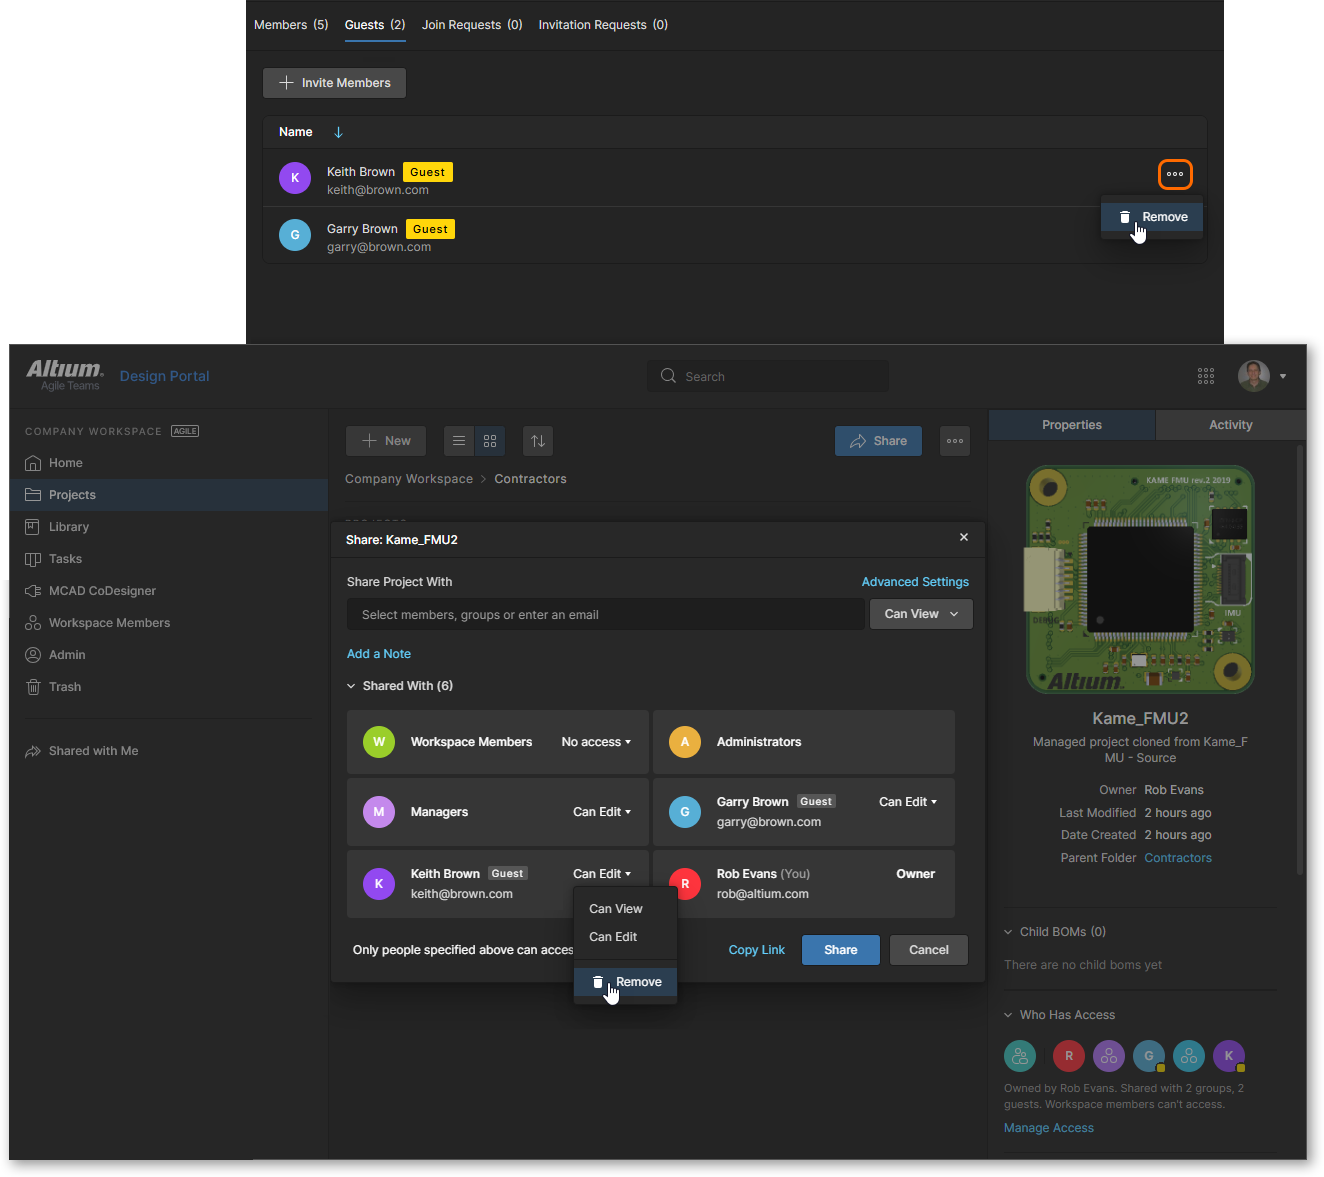
Removing a User
To remove an existing user from the Workspace select that user, click the control to the far right, then choose the Remove command from the associated menu – depending on your level of software access, this may be a simple  icon. A dialog will appear asking for confirmation to proceed with the deletion. Click
  to proceed, after which the user will be removed from the Workspace's user database. They will no longer have access to the Workspace.
A user cannot remove themselves. In addition, a user who is actively connected to the Workspace cannot be removed.
If the Workspace member to be removed is the Owner of any Workspace Items (Projects, Managed Content, Components, etc), a dialog will open to request the nomination of a new Owner for the noted number of Items. Use the drop-down menu list to select a Workspace member that will adopt ownership of the Items, confirm the selection with the  button and then the
  option in the following dialog.
A notification email (if enabled) will inform the new Owner of the changes. 
 If required, specify a user that will become the new owner of the Items currently owned by the user to be removed.
See Transferring Project Ownership for related information on manually specifying a new project Owner.
-
If a user was added as a Workspace member when a project was shared with them, through the Invitation Request process, then they will be demoted to a Guest level when removed. This maintains their access to the project specifically shared with them, which is then available through the Shared with Me view in their Personal Space or another Workspace they are a member of.
-
The remove operation cannot be undone. If you remove a user by mistake, you will need to add that user back – by inviting them into the Workspace – in the same way that you would invite any new user.
Processing a Join Request
Users who are registered with your organization's account – as defined in the Dashboard's Users and Groups page – and do not have access to your company Workspace can request access via their My Profile page.
See Joining Your Organization Workspace for information on creating a Join Request.
For related information see See Company Workspace Already Activated? and Need Access to Your Company's Altium Account?
Such a request will generate an access request email to the Workspace owner administrator and also create a Join Request entry in the Workspace Members page. The latter is accessible to administrators via the Join Requests tab option at the top of the page, which includes the current number of pending requests. Note also that the Workspace Members navigation entry has an associated red dot to indicate the presence of pending Join Requests.
Open the Join Requests view to approve ( ) or decline (
 ) a request entry, or use the
  and
and  options to approve/decline all listed request entries. In the dialog window that follows, assign a Group (or Groups) to an accepted user, who then will be added as a Workspace member on confirmation (
 ).
).
When the process is complete, confirmation emails will be sent to both the administrator and the user who created the request.
Processing an Invitation Request
Workspace members who are not in the Administrators group can submit a Workspace access request for another user from the button on the Workspace Members page, or when sharing a project with user who is not a member of the Workspace. Note that Administrators can directly grant access for such users.
See Submitting an Invitation Request (Non-admin Members) and Sharing with Users outside the Workspace for information on requesting access for another user.
In a similar way to Join Requests outlined above, this will generate an access request email to Workspace administrators and also create an Invitation Request entry in the Workspace Members page. The latter is accessible to administrators via the Invitation Requests tab option at the top of the page, which includes the current number of pending requests.
To grant Workspace access for the requested user, or to reject the submission, open the Invitation Requests view where you can approve () or decline () a request entry, or use the and options to approve/decline all listed request entries. In the dialog window that follows, assign a Group (or Groups) to an accepted user, who then will be added as a Workspace member on confirmation ().
When the process is complete, a confirmation email will be sent to the user who created the request (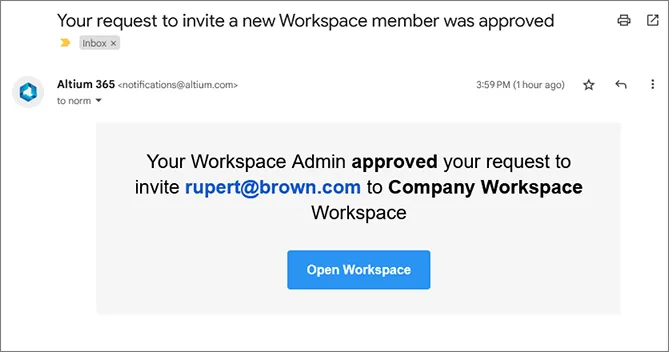 ), and a Workspace invitation email sent to the newly added user (
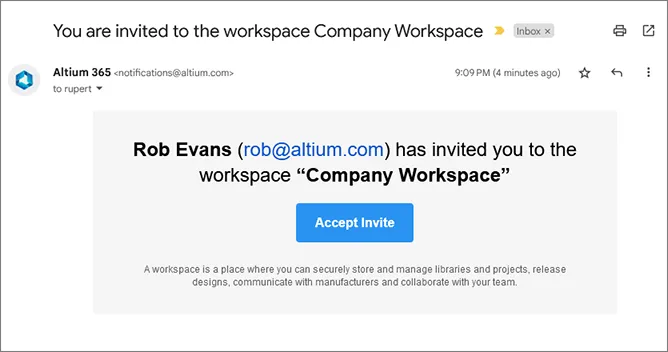 ).
).
If the user invitation request has been generated through the project sharing process, then that user is granted Guest access until the Invitation Request is approved. If the request is declined, the user remains at a Guest-level of access to the project.
When the user has been approved and accepted as a Workspace member and then subsequently removed, they will be revert to Workspace Guest status with Guest-level access to the shared project – as available through the Shared with Me view only.
Managing Guest Users
Users who are not members of the Workspace that have been granted shared access to a Workspace project are regarded as external user 'guests'. They have access to those shared project resources via the Shared With Me page in their Altium 365 Personal Space or in an Altium 365 Workspace they are a member of.
For related information, see Sharing with External Users and also this Workspace access Knowledge Base page.
The Guests tab option on the Workspace Members page provides a quick way for Workspace Administrators to view a list of all external users that have been provided shared access to the Workspace as guests. Each entry has an associated  label, which is also used to distinguish Guest users in the project Share window.
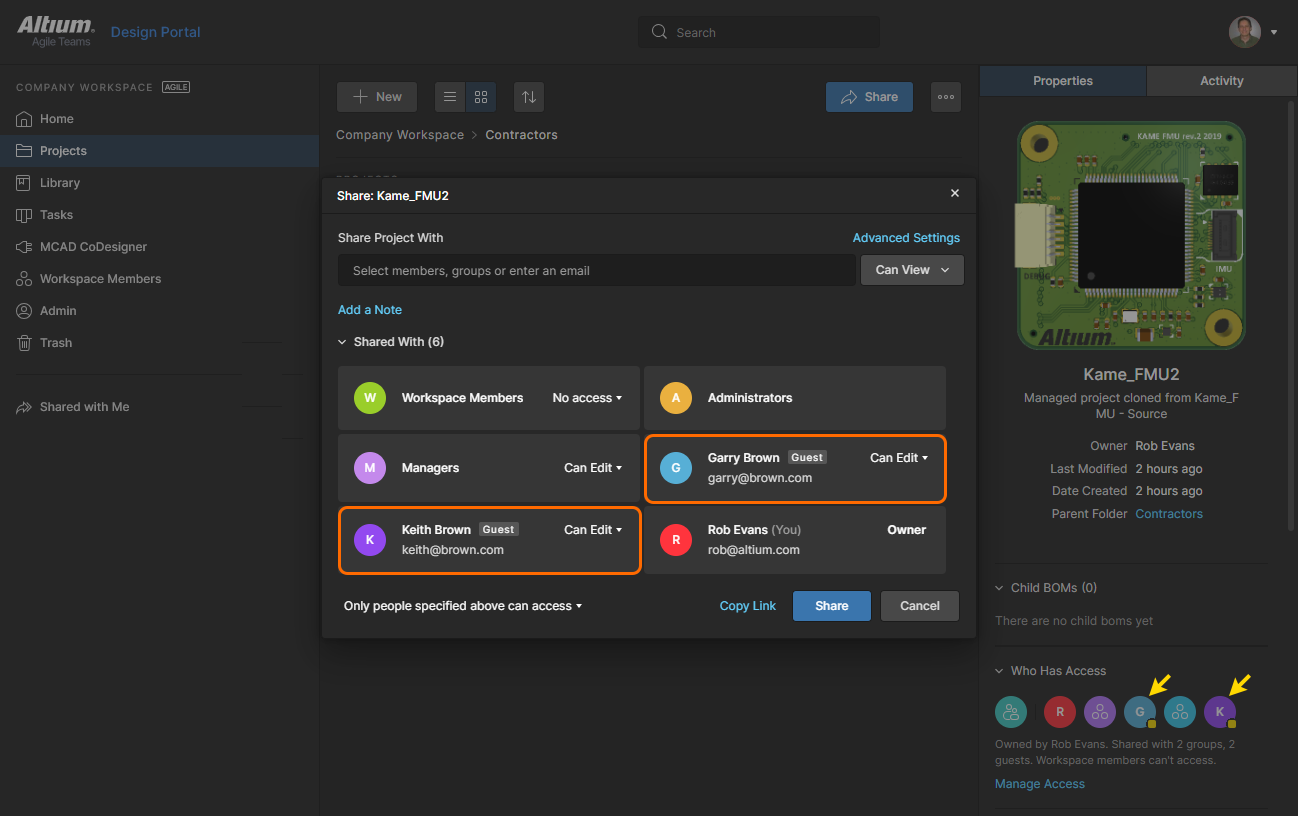
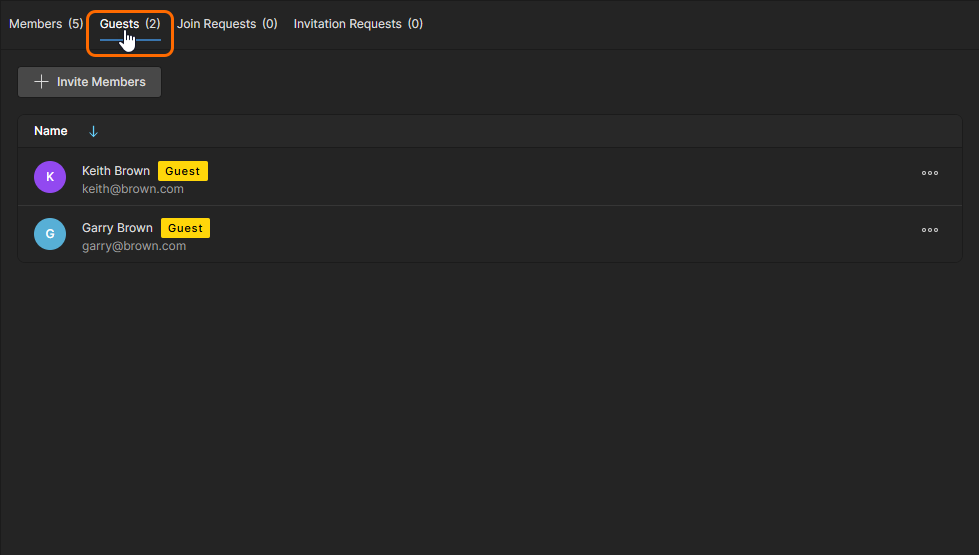
A Guest user's entry will remain in the list while a Workspace project is shared with them or until it is deliberately removed. You can indirectly remove a Guest entry by locating Workspace projects shared with them and removing their shared access. To directly remove a Guest and revoke their shared access to all projects, select the Remove option from the menu associated with their entry in the Workspace Members page.
Note that if your Workspace is enabled by a suitable level of Altium product access then an additional Review Accesses option is available for all Workspace member entries and listed Guest users. This option will open the Projects view with the Has Access filter option automatically enabled for that user  – the view will therefore include only those documents the user has access to.
See Projects Filters for related information.

Admin – Groups
This page is used to manage groups for the Workspace. Groups allow you to further organize your existing Workspace members according to, for example, the particular section of the organization in which they are involved, or the design team they are in. Or perhaps they are people outside of your own organization, such as contractors, design bureau personnel and the like. Groups also make the sharing of Workspace content and the configuration of other served technologies more streamlined. Note that the Workspace Groups feature is available with the higher-level of access to Altium Solutions.
Several sample groups are defined at the time your Workspace is activated. This includes the group Administrators. This group gives administrative privileges to its members. Anyone who is a member of this group has complete access to the Workspace and all associated technologies and services through the browser interface.
The same user can be a member of any number of defined groups.
 of users, from the Admin – groups page of the browser interface.") Create specific groups (or 'memberships') of users, from the Admin – groups page of the browser interface.
Create specific groups (or 'memberships') of users, from the Admin – groups page of the browser interface.
All defined groups are presented in a flat listing.
Within the main listing, each group is displayed in terms of the following information:
-
Groups – the name of the group.
-
Members – how many unique Workspace members are part of this group.
The Edit ( ) and Remove (
 ) buttons at the top-right of the listing (and also available from the menu associated with the control for a group) enable you to edit the selected group or to remove it. The Administrators group cannot be removed.
Click the  button and choose to Sort by Group or Sort by Members. In addition, you can search for a group by name (Groups field) using the dedicated Search field at the top.
Adding a New Group
To add a new group, click on the  button, located at the top-left of the page. The Create Group window will appear with which to define the group, in terms of its name and members.
 When adding a new group you will be presented with a window in which to specify that group and its members.
Use the Group Name field to enter a meaningful name for the new group. For example, this may be a name that is reflective of the task performed by its members. This is a required field.
You will be prevented from trying to create two groups with the same name.
You can also specify constituent users for the group (its members). These can only be existing members of your Workspace. Start typing the first name, last name, or email address of a user in the Add Members field, to pop up a list of matching Workspace members. Select the required user from the list. Multiple users can be chosen as members of the group.
Group membership may be specified at any stage but if users exist, it can be easier to do this at the time of group creation.
 Example group with nominated members, ready to be created.
With name and members defined as required, click  to effect the creation of the group. The group will now be available in the list of groups for use in applicable areas elsewhere in the Workspace's browser interface – for example when inviting/editing a user, or sharing permissions for access to shareable data items within the Workspace.
Editing an Existing Group
You can edit an existing group by:
-
Selecting that group and clicking the Edit () button at the top-right of the listing.
-
Selecting that group, clicking the control to the far right, then choosing the Edit command from the associated menu.
The Edit Group window will appear, from where you can make any changes to the group's name and/or user membership as required.
The Administrators group cannot have its name changed. You can, however, manage members for this group, as with any other user-created group.
 Access and make changes to a group as required.
-
To remove an existing user from the group, select their entry then click the  control in the window's lower border.
-
To add a new user to the group, click the  button, enter a Workspace member name in the upper field and press Enter to confirm.
When all modifications have been made as required, click the button to effect those changes.
Removing a Group
You can remove an existing group from the Workspace by:
-
Selecting that group and clicking the Remove () button at the top-right of the listing.
-
Selecting that group, clicking the control to the far right, then choosing the Remove command from the associated menu.
A dialog will appear asking for confirmation to proceed with the deletion. Click to proceed, after which the group will be removed from the Workspace.
The Administrators group cannot be removed.
The remove operation cannot be undone. If you remove a group by mistake, you will need to add that group back, in the same way that you would create any new group.
