An Altium 365 Workspace is a dedicated server for your managed content. Hosted on the Altium platform, it facilitates the connectivity of the design, manufacturing and supply domains, and the mechanics for moving data between them.
To be able to activate and use a Workspace for your company, you need to be registered with an Altium Account and have a purchased level of Altium product access – this will determine the features and functionality available to you in relation to Altium 365.
Security
For the latest information on the security, reliability, privacy, and compliance of the Altium cloud platform, upon which an Altium 365 Workspace resides, please visit the Altium 365 Trust Center.
Activating Your Company Workspace
If you are a user added to your company's Altium account – you have joined the Organization – and your company has not yet activated its Workspace, then you will be guided to do so. There are various places in which to find controls to facilitate this:
In any of these areas, click the available control to start the process of Workspace activation. You will be taken directly to a dedicated web page (https://www.altium.com/365-intro/activate-new) with which to do so.
Then follow these steps:
-
Enter the name you wish to call your Workspace. By default this field will be pre-filled with the name of your Altium account.
-
Choose a location from the drop-down to which you and your team are closest. By default the location will be preselected based on the Country entry from your Altium Account profile contact information.
-
Choose whether or not you want sample data created in your Workspace. This can be very useful because it gives you a collection of projects, components and templates with which to explore the capabilities of the Workspace. To make use of this, leave the Include sample data option enabled.
-
Click  .
.
 Provided you are a user added to your company's account with Altium you can activate the Workspace for your company, if it has not been activated already.
If your organization does not allow the creation of Workspaces, you will be presented with a Request Workspace Activation window where you can send a note to the organization administrator(s) requesting Workspace activation ( ). The availability of Workspace activation is determined by the Advanced Controls page settings in the Company Dashboard.
Activation will proceed and you will be alerted on the page when this process is complete, after which you will be taken to the Workspace. As the person activating the Workspace, you will also be notified through an email, with a link to access the Workspace.
-
As the creator of the new Workspace you are automatically added to its Administrators Group. Administrators have full access control to the Workspace and all associated technologies and services through its browser interface.
-
Other users who are registered with Altium, such as members of your organization that have been added to your Company Account, may be provided access to a Workspace by inviting them to be a member. See Inviting other Users to Your Workspace for more information.
-
Note: Depending on your level of access to Altium Solutions, the management of your account (ongoing billing, invoices, subscriptions) is available through the Workspace Usage and Billing page or your organization’s Company Dashboard.
Once you have activated your organization's Workspace (or have been added as a member of one) you will be able to access its browser interface directly by signing in to the Altium 365 Platform Interface ( https://365.altium.com). For information on how to connect to your Workspace from within Altium Designer, see Access from within Altium Designer.
Company Workspace Already Activated?
If you are a user added to your company's account with Altium but the Workspace for that organization has already been activated, then the activation web page (https://www.altium.com/365-intro/activate-new) will alert you to this, and you will be given the ability to request access to that Workspace from one of its Administrators. Click the  button to proceed.
 Where the Workspace for your company has already been activated, you are able to send a request for access from its Administrators.
The Administrators for the Workspace will receive an email alerting them to your request. They can then decide whether or not to act on it, to provide you with access to the Workspace.
The sent user request also will add an entry to a Workspace Join Requests list included at the top of your company's Workspace Members page, where it (and any other pending requests) can be approved or declined by a Workspace Administrator.
 Requests to join a Workspace are added to its Members list where they can be approved or declined by a Workspace Administrator.
Need Access to Your Company's Altium Account?
When registering independently for access to Altium 365, the third step will offers the opportunity to join your company’s Altium account by choosing from a list of suggested organizations. The list is based on your (presumed corporate) email address. When confirmed with the  button, the selected entry will send a join request email to the organization’s account administrator, who can Approve or Decline the request.
 When registering with Altium 365 you have the option to request to join an organization.
If you have skipped this step, it can be performed through your user profile page after registration is complete. When signed in to your Altium account, open the My Profile view from the upper user menu and then choose an organization to join from the Join Organization list on the Profile page. Click the  button to send a join request to the organization’s account administrator.
As above, the Group Administrators for the selected organization's Altium account will receive an email alerting them to your request. They can then decide whether or not to Accept or Decline.
 if you signed up to Altium 365 using a corporate email you can request to join that organization via your My Profile view to access its Workspace.
Are there any Limitations?
The following is a list of considerations with respect to Workspaces:
Following industry best practices for security and data integrity, Altium 365 supports TLS (Transport Layer Security) 1.2. As such, to be able to connect to an Altium 365 Workspace from your design software you must be using an Altium Designer instance that includes support for TLS 1.2.
-
Note that when connected to a Workspace from Altium Designer, access will be at the level of your purchased Altium software arrangement. However, if you are an invited member of another company's Workspace and that Workspace provides a higher level of access, please be aware that some Altium 365 features and data may not be available to you.
-
Accessing a Workspace (for which you are an invited member of) from a web browser, or MCAD software, is free.
-
Accessing a Workspace (for which you are an invited member of) from within Altium Designer requires a suitable level of Altium product access.
-
There is no limit on:
-
How many users can connect to a Workspace instance through its browser interface.
-
How many users can connect to a Workspace instance through Altium Designer (naturally limited by the level of purchased Altium product access).
-
The number of users added as members of a Workspace instance.
-
The number of MCAD Engineers connecting and collaborating on projects that are managed within a Workspace instance.
Privacy & Sharing
Related information: Sharing a Project and Managing Content Structure & Access
An Altium Workspace controls the basic sharing of content through its hierarchical permission inheritance scheme, where an item (or sub-folder) adopts the permission set of its parent folder. So for example, if a folder has Edit (write) access for a particular user (or group), then a project created within that folder will be shared with that user (or group). A subsequent change in the parent folder permission set will similarly alter the permissions of its child items or folders, which inherit those changes.
By default, Workspace folders are shared with Edit permissions for all Workspace members. This access includes the top-level Projects folder – the default location for existing and newly created project items – which means that all Workspace members will have full access to all existing and created projects.
This initial sharing state can be updated and managed by:
-
Changing folder permissions – Administrators and folder owners (the creator) can modify (add, remove, etc) folder permissions, and these changes will be inherited by the folder's child items/projects. This is a coarse level of sharing management since it affects all items in a folder for all users. More information.
-
Changing project (or item) permissions – Administrators and users with Edit rights to a project can modify the share permissions for a specific project to provide explicit control over which users (or groups) have edit/view access to that project. More information.
-
Managing the default permissions for newly created projects – Administrators can define a specific set of share permissions that are applied when a project is created. This option will overrule the default behavior where a created project adopts its parent folder’s permission set. More information.
-
Controlling project resharing and downloading – Administrators and project owners can control whether a project that has been shared with other users can be reshared or downloaded. See below and more information.
The availability of some features is determined by your level of Altium product access.
Note that along with the permission set of its host folder, a newly created project also will include the user who created the project (its Owner) and the user who created the host folder (its Owner).
Because folders and project items inherit their share permissions from their parent folder, there will be circumstances where you cannot change (more specifically, demote) the permission set of those child entities. The option to reduce share access from, say, Edit to View is prevented because it would contravene the existing parent-to-child permission inheritance of the editing rights. 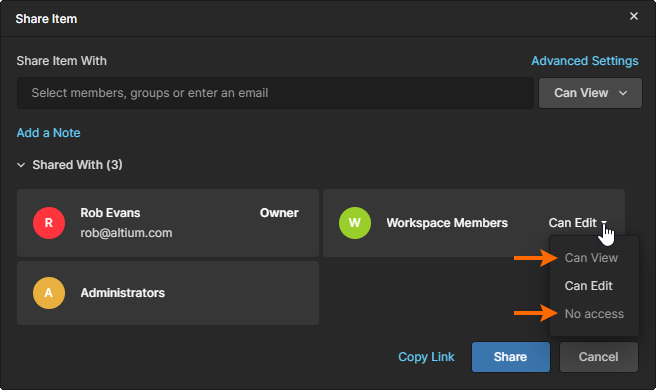 This can be overruled by disabling the Inherit parent folder permissions option under Advanced Settings in the Share window, which effectively ‘breaks’ the parent-child permission inheritance to enable all share access options.
See Inheritance-controlled Sharing Restrictions for more information.
While the inheritance of parent folder permissions is enabled by default, the provided Sample projects have this option disabled. All sharing options are therefore available to ease the evaluation process.
You can share your designs with people outside of your Workspace as Guests – either for viewing and commenting only, or for editing – without the need to invite them to be members of that Workspace. This allows invited stakeholders to view/edit (as applicable) a live, work-in-progress design project, without gaining access to your full server of design data.
-
If granted viewing access only, the invited stakeholder can view and comment on the design from within Altium Designer, or through the Altium Platform Interface. As those with editing rights make changes to the design and commit them, those changes can be viewed 'live' by the external Guests. To view the shared design through the web interface, from anywhere, all that's needed is registration with Altium 365 to gain access.
-
If the invited stakeholder has been granted editing rights to the design, then they can open and edit from within Altium Designer – ideal for external contractors.
You can create and share a manufacturing package without inviting people to be members of your Workspace. Those people can then browse the content of that package through Altium 365's Manufacturing Package Viewer. This is an element of the Altium 365 platform's Global Sharing support that allows invited stakeholders to view a manufacturing package from any web browser, anywhere in the world, but outside of your Workspace. This allows you to keep your actual designs and other valuable IP off limits.
There is no ability to share data between two Workspace instances.
Resharing & Downloading
When sharing data with others, the owner of that data can determine whether it can be reshared with others (onward-sharing) and also whether the data can be downloaded by people with view-only access rights. Note that the availability of this feature is determined by your level of Altium product access.
These advanced settings apply to the following:
-
Design Projects – shared from within the Workspace. For people with editing rights, you can control whether a person can reshare with others. This allows you to restrict further resharing by external contractors (Workspace Guests), for example. For people with view-only access, you can control whether they also can download the project's data – both its native data (project itself) and its derived data (generated Gerbers, PDFs, etc). They can still view data in the Web UI and provide comments as normal. In each case, separate permissions are provided for people inside and outside of the Workspace – Members and Guests.
See Advanced Settings for more information.
If a person with view-only access rights is not permitted to download, then they can only view the project through the Web UI. They can not view the project through Altium Designer, since the project would otherwise need to be downloaded first to do so.
-
File uploads – uploaded to, and shared from within, your Personal Space. Controls allow you to determine whether the person you share the upload with can share with others, and whether they are allowed to download the entity or its derived data.
Controls for determining who can reshare a project, or download files from it, are accessed by clicking the Advanced Settings control in the Share window. These settings are applied to each project/upload separately.
Access Expiration & Data Retention
If a Workspace team member attempts to connect to your Workspace, but the purchased Altium product access level has expired, they will be alerted to this fact on connection. They will be given the choice to temporarily connect to the Workspace with full access, or to contact an Altium representative to discuss software access renewal.
If there is no active Altium product access level across any of the products for your Altium company account (to which your Workspace is associated), then the Workspace will switch over to being Read-only. All Workspace members will still be able to view/work with existing content in the Workspace, but will not be able to modify that existing content in any way, nor create any new content.
In addition, this use of existing content is only permitted for the time period defined in the Data Retention Policy.
Data can be extracted from the instance prior to that by:
-
Exporting components to IntLib format.
-
Checking out designs.
-
Downloading release packages.
Managing Workspaces
You can see a listing of the Workspaces to which you currently have access (are a member of) from your Altium Account Profile page. from the Workspaces page of your Altium Account Profile.
Directly access your Altium Account Profile Workspaces page using the URL: profile.altium.com/workspaces/. Alternatively, click the My Profile link on the Altium Account menu (accessed by clicking on your photo/picture at the far right of the web page top banner) then navigate to the Workspaces page.
If you are the owner of your company's Workspace, that Workspace will appear under your company name. If you have been added as a member of one or more Workspaces (for your own company and those of other companies), these will appear under the sub-section Shared with me. Your Personal Space – automatically included in Altium Accounts – is also listed.
Listed workspace tiles include the following:
-
Workspace Name – the name of the Workspace. The tile is a live link that, once clicked, will take you to the Altium 365 Platform Interface with that Workspace loaded as the active Workspace.
-
User Count – the current number of members in the Workspace. There is no limit to the number of users that can be added to a Workspace.
-
Location – the global region where the Workspace instance is hosted.
-
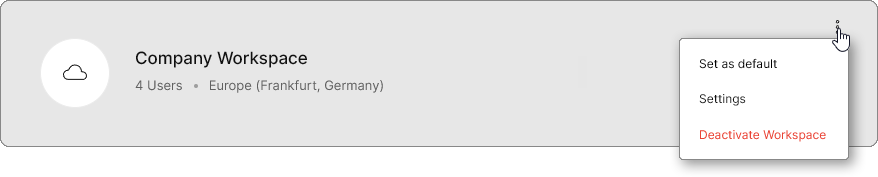
Settings and options menu – the ellipsis menu on the right of each Workspace entry allows you to:
-
Set the entry as the default Workspace. If you have access to multiple Workspaces, setting one as the default means that when you sign in to the Altium Platform Interface, that Workspace will be loaded as the active Workspace. If a default is not defined, the alphabetically first Workspace will be loaded.
-
Leave a Workspace. This option is only available for another organization's Workspace, which has been shared with you (by invitation to that Workspace).  Click to remove yourself from the Workspace and confirm in the following Leave Workspace window. You will be removed as a member from that Workspace, and the tile entry for the Workspace will be removed from your available Workspaces listing.
-
Settings. This option accesses the Admin – Settings – General page of the Workspace's browser interface, from where changes to the Workspace's name, server address, and description can be made. This option is available only when you are a member of the Workspace's Administrator Group.
-
Deactivate Workspace. This option is available only for a Workspace that has been activated for your organization (and for which you are the owner). Click to deactivate the Workspace. In the following Deactivate Workspace window, enter the name of the Workspace and then click the Deactivate button to proceed with deactivation.
A deactivated Workspace disappears from all user interfaces and becomes inaccessible to users. In accordance with the timings stated in the Data Retention Policy, a deactivated Workspace may be reactivated by request at any stage during the two month period after deactivation. After two months, Altium will take a snapshot of the Workspace and delete the Workspace itself from the Altium 365 infrastructure. Six months after that, the snapshot itself will also be deleted.
Note that if purchased software access lapses for the account to which the Workspace is associated, then that Workspace will become Read-only.
Changing Your Account Email
There may be an occasion where you need to change your username – the email portion of your Altium Account credentials, which you use to sign in to your Altium account and indeed the Altium platform. For example, various use cases include:
-
The email domain for your company might have changed.
-
A new company email is needed upon acquisition/merger/divestment.
-
You need to change the personal email that is being used.
-
You need to change from using a personal email to a company domain email.
You have the ability to change the email by yourself, from the Authentication page of your Altium Account Profile.
Directly access your Altium Account Profile Authentication page using the URL: profile.altium.com/authentication/. Alternatively, click the My Profile link on the Altium Account menu (accessed by clicking on your photo/picture at the far right of the web page top banner) then navigate to the Authentication page.
The procedure to change your email is outlined in the following set of images:
Note that your Profile page (profile.altium.com/) also may include the name of your organization/company, or a drop-down list selection for joining one. For a self-registered user to an Altium Account – who is not part of an actual company – a 'single person organization' is created based on the registered First Name and Last Name entries. When changing your email, the organization entry will not change.
Things to consider:
-
If you use third-party accounts (such as Google® or Facebook®) to sign in to your Altium account, these will no longer work after the email is changed. You will need to link such accounts to your Altium account (using the new email) again.
-
If your company has set up SAML Single Sign On functionality with SCIM (System for Cross-domain Identity Management) provisioning, then you will not be able to change the email yourself using the process described above. You will need to contact your IT Administrator to request the change.
-
If you no longer have access to the original email, you will have to request a change through Altium Support.
-
You will be prevented from using an email address that is already registered with Altium.
-
You can also change the password associated with the email address using the Change Password option on your Profile page.
-
Your email address also can be changed in the Company Dashboard by a Group Administrator. Note that in this case your password must be reset to validate the new sign-in credentials.
Enabling 2-Step Verification
Related page: Configuring Sign-in Authentication
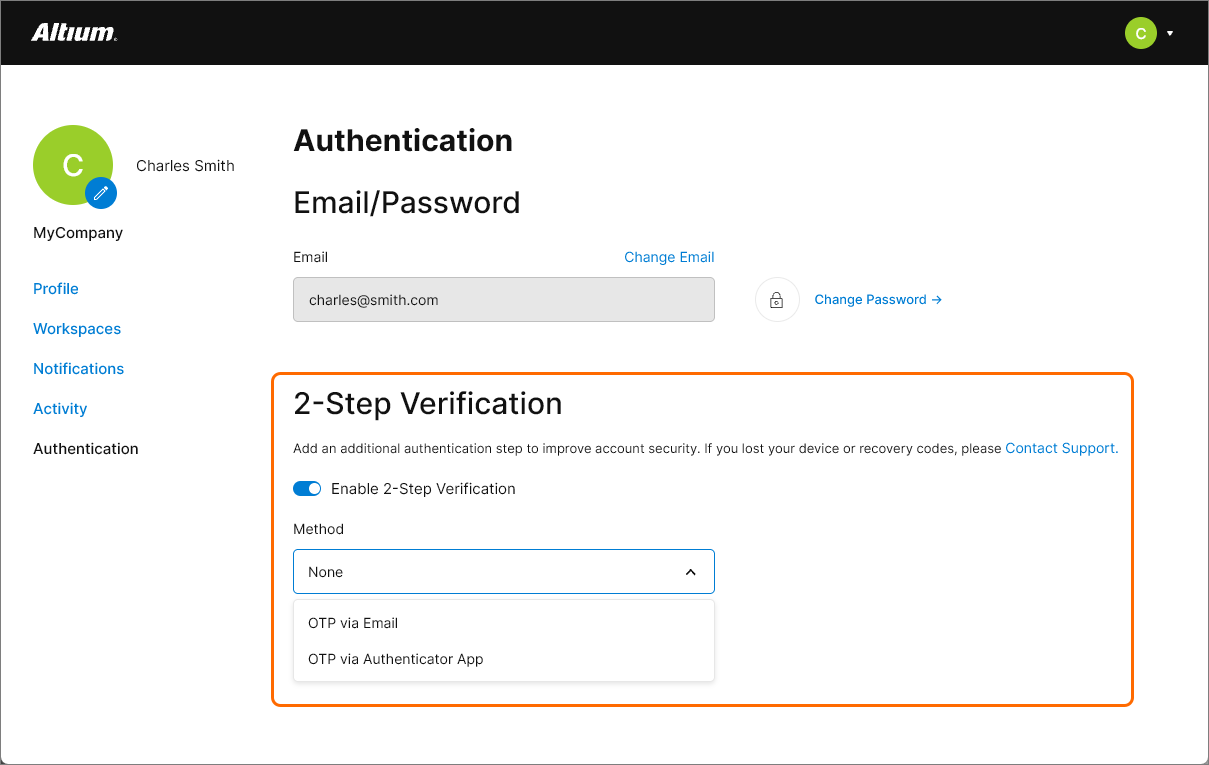
If you are registered as a member of your organization’s Altium Company Account you will also have the option to enable 2-Step Verification for signing in to your Altium Account. To configure this option, navigate to the Authentication page in My Profile (profile.altium.com/authentication/), select the Enable 2-Step Verification option, and then choose a receiving target for the OTP (One Time Password) code generated with each sign-in.
If you have configured 2-Step Verification for a specific application/device and it is no longer accessible, you can sign in to your account Authentication page (through My profile) using one of the provided recovery codes to disable 2-Step Verification. It then can be re-enabled and configured for a different application/device.
In this situation however, if 2-Step Verification has been enabled at an organization level then the settings will be read-only and you will need to contact a Company Account Administrator.
Changing Workspace URL
When a Workspace is first activated, it is given a system-generated URL, based on the name of the account with Altium. Should you wish to change this – for example, to better reflect your company name – it can be edited from the Admin – Settings – General page of the Workspace's browser interface. Note that the change can only be made by the Administrator who is also the Owner of the Workspace (the user who created it), and not by any other Administrator of that Workspace.
Be sure to click the  button – at the top-right of the page – to effect the change.
 The owner for the Workspace can change its URL to something more meaningful for your company.
Org-level Changes
Companies that have purchased an advanced Altium Solution also will have access to an associated Company Dashboard, where a Group Administrator manages your account settings such as user access, authentication, licensing, etc. This includes high level Workspace management actions available in the Dashboard’s Workspaces area, which can be accessed in the following ways:
-
Once signed into the Altium Account, use the URL: https://dashboard.altium.com, or click the Company Dashboard link on the Altium Account menu (accessed by clicking on your photo/picture at the far right of the top banner). Once in the Dashboard, select the Workspaces navigation entry.
-
Once signed into the Altium Account, use the direct URL: https://account.altium.com/workspaces.
See Managing Altium 365 Workspaces for related information.
The Workspaces page will list all Workspaces currently available for your organization. Access management commands for a Workspace entry by clicking on the ellipsis button at the far right of its tile. The Workspace Settings and Deactivate Workspace options are the same as those available through the user Profile page – see above – whereas the Change Owner option is unique to the Company Dashboard.
The Change Owner option allows the owner of the Workspace to be changed to another user within the organization, which is especially useful if the current owner is no longer with the company or associated with Workspaces. The command is followed by a Change Owner window, where the new Workspace owner's email address is entered, and the change then confirmed with the  button. The Workspace tile's current Owner entry will update accordingly.
 Workspace management controls available at the organization level.
Group Administrators of your Company Account also have control over how members of your organization sign in to their Altium Accounts, and therefore access Workspaces. This is determined by the Authentication page settings in the Company Dashboard, which will overrule any sign-in services and 2-step verification method specified by individual users.
See Configuring Sign-in Authentication for more information.
